Gartner’s How to Achieve the Minimum Viable AI Governance


Blog
Automating the Mac Software Package on a Linux Based OS

Company & Product News

Distributing a macOS software is not an easy task. It requires taking the binary, signing it, packaging it, signing the package and notarizing it. These tasks are simple when using a machine running macOS. However, when trying to build a CI/CD pipeline, you often come across a Linux OS based device (such as a Jenkins slave).
The problem is the tools needed for these tasks are only available on macOS. In this article we will show an automated workaround we developed to solve this problem.
What You Need Before Getting Started
For signing:
- Mac Developer Installer certificate
- Mac Developer Application certificate
- Apple Worldwide Developer Relations Certification Authority
For notarization:
- API key for app store connect API
- Key ID
- Issuer ID
Certificate Retrieval
The task will be accomplished in two stages:
The first: Enrolling in the Apple Developer Program
To get the certificates, you’ll need an enrolled Apple Developer ID. You can enroll either as an individual or as an organization. Visit the following link to read more about this process: https://developer.apple.com/support/app-account/
The second: Downloading Developer Certificates
After your Apple ID has been enrolled, head over to: https://appstoreconnect.apple.com/get_started
Retrieving the developer certificates
Make sure you sign in with the Account Holder Account! Without it you won’t be able to download the certificates.
Once signed in, select View account:

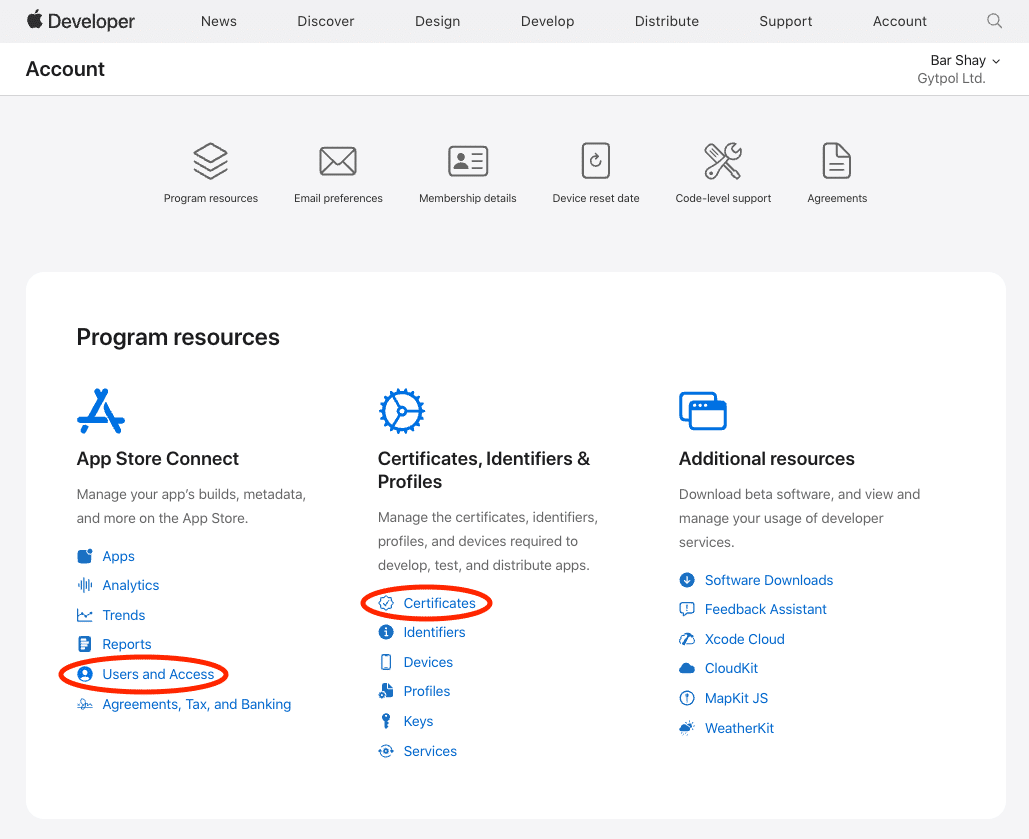
This will lead you to the main Account dashboard. Select Program resources.
From here we will retrieve:
- Certificates: Mac Developer Installer certificate, Mac Developer Application certificate
- Notarization stuff: api key for app store connect api, key id issuer id
To get the certificates:
- Select Certificates below Certificates, Identifiers & Profiles.
- Under the Certificates tab, select the blue + button near the title.

- One at a time, select Developer ID Installer and Developer ID Application and continue.
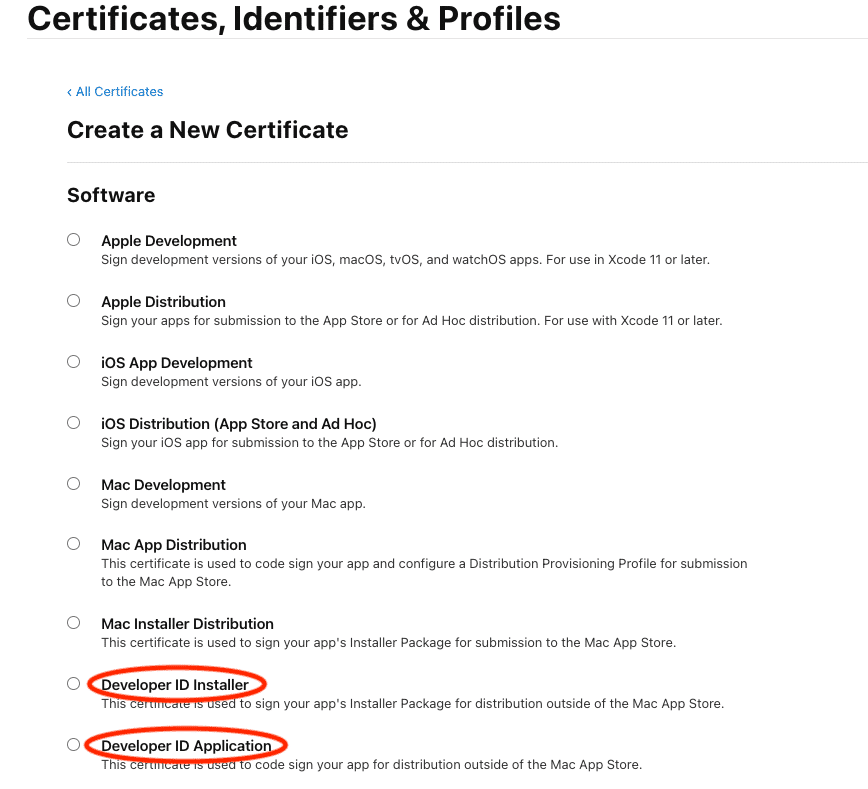
- This action will generate the certificates and you will be able to view them back at the Certificates tab.
- Click on each certificate and download them.

- Next, to get the Apple Worldwide Developer Relations Certification Authority certificate, click again on that blue button and scroll to the bottom of the Create a New Certificate page.
- Download Apple Worldwide Developer Relations Certification Authority (Expiring 02/20/2030) by clicking on the link:

According to Apple:
"The Apple Worldwide Developer Relations Intermediate Certificate has a version that’s set to expire on February 7, 2023 and a renewed version that’s set to expire on February 20, 2030. The renewed version is used to sign new software signing certificates issued after January 28, 2021."
Now that we have the certificates, it’s time to get the notarization stuff.
Retrieving the notarization info
Head back over to Program resources in the main Account dashboard and select Users and Access under App Store Connect (shown above).
Select the Keys tab and on the side menu Key Type select App Store Connect API.
Click the blue + button beside the Active title.
Enter a Name and Access for the key and click Generate
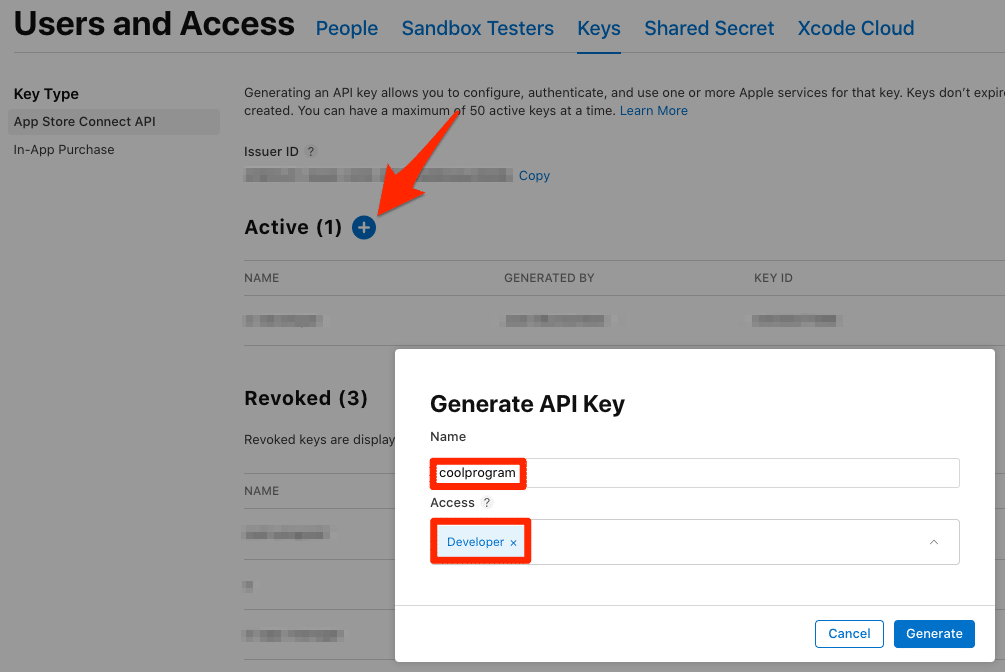
Now, copy the Issuer ID & KEY ID, download the API Key and save all three of them for later.

Last and final thing you’ll need to do in this step is convert the Mac Developer Installer certificate & Mac Developer Application certificate to a p12 format.
Follow this process twice for each certificate:
- Generate a private key
openssl genrsa -out distribution.key 2048 - Convert <mac-developer-cert>.cer to .pem format
openssl x509 -inform der -in distribution.cer -out distribution.pem - Convert Apple Worldwide Developer Relations Certification Authority certificate to pem format:
openssl x509 -in AppleWWDRCA.cer -inform DER -out AppleWWDRCA.pem -outform PEM - Convert your cert plus Apple’s cert to p12 format (choose a password for the .p12):
openssl pkcs12 -export -out <mac-developer-cert>.p12 -inkey distribution.key -in <mac-developer-cert>.pem -certfile AppleWWDRCA.pem
Automating the Process
In our example, the package we're building consists of two files:

- A LaunchDaemon which will be deployed to /Library/LaunchDaemons
- A binary which will be deployed to /opt/coolprogram
We will store it under a directory called pkgroot
root@ip-10-1-0-1:/home/ubuntu# ll pkgroot/
total 16
drwxr-xr-x  4 ubuntu ubuntu 4096 Nov 17 08:06 ./
drwxr-x--- 11 ubuntu ubuntu 4096 Nov 21 14:02 ../
drwxr-xr-x  3 ubuntu ubuntu 4096 Nov 16 08:22 Library/
drwxr-xr-x  3 ubuntu ubuntu 4096 Nov 16 08:22 opt/
We use several tools inthe process of building and signing the package, you can install them by running the following commands:
apple-codesign
wget <https://github.com/indygreg/apple-platform-rs/releases/download/apple-codesign/0.20.0/apple-codesign-0.20.0-x86_64-unknown-linux-musl.tar.gz> && \\
tar -xvf apple-codesign-0.20.0-x86_64-unknown-linux-musl.tar.gz -C /usr/local && \\
ln /usr/local/apple-codesign-0.20.0-x86_64-unknown-linux-musl/rcodesign /usr/local/bin
bomutils and cpio
apt-get install make g++ libxml2-dev cpio -y
git clone <https://github.com/hogliux/bomutils.git> && \\
cd bomutils/ && sed -i 's/data/dataa/g' src/lsbom.cpp && sed -i 's/data/dataa/g' src/mkbom.cpp &&  \\
make && make install
xar
wget <https://gytpol-public-items.s3.us-east-2.amazonaws.com/xar-1.6.1.tar.gz> && tar -xvzf xar-1.6.1.tar.gz && \\
cd xar-1.6.1/ && echo " deb [trusted=yes] <http://security.ubuntu.com/ubuntu/> bionic-security main" >> /etc/apt/sources.list && \\
apt-get update && apt-get install -y  libbz2-dev libssl1.0-de  && ./configure && make && make install
Next, we will need to sign the binary file before we can create the package.
Signing binaries / packages requires using both the Developer ID Application and the Apple Worldwide Developer Relations Certification Authority certificates.
Note: in our example, we have our certificate password protected
In our case, the first one is called cert.p12 and the second certroot.cer
However, the rcodesign tool requires the two to be merged into one certificate with two different certificate types, so, we will use the following commands to create a pem file and a der file
openssl pkcs12 -in cert.p12 -password pass:<PASSWORD> -certfile certroot.cer -nodes | openssl rsa -out key.pem
openssl pkcs12 -in cert.p12 -password pass:<PASSWORD> -certfile certroot.cer -nodes  | openssl x509 -outform der -out cert.der
Now, we can sign the binary by running the command
rcodesign sign \\
--pem-source key.pem --der-source cert.der \\
--code-signature-flags runtime \\
./pkgroot/opt/coolprogram/binfile
We now have a signed binary file that can run on a mac without errors.
Creating the package file
When using macOS, we can use apple tools to create the package, it creates several files describing the content of the package, installation instructions and other files. Unfortunately, we don’t have this luxury when using linux so we will need to build the package content ourselves.
A package consist of two files:
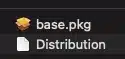
However, the base.pkg is also a package which consists of the following files
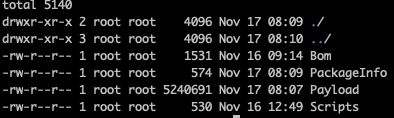
Let’s create a folder that will contain all the files needed to make the package, call it flat.
In order to create the Bom file (this file list the files in the installation – their path, octal mode, UID/GID, size and CRC32) we will use the bomutil we installed earlier.
mkbom -u 0 -g 80 ./pkgroot/ .flat/base.pkg/Bom
In our example, we have two scripts included – one for pre-installation and one for post-installation. for reference, this is our pre-install script:
#!/bin/bash

sudo launchctl unload /Library/LaunchDaemons/com.coolprogram.binfile.plist

exit 0
We must add execution permissions to the scripts and to the binfile as well:
chmod +x ./scripts/preinstall
chmod +x ./scripts/postinstall
chmod +x ./pkgroot/opt/coolprogram/binfile")
Next, we will create the Scripts and the Payload files:
cd ./scripts && find . | cpio -o --format odc --owner 0:80 | gzip -c ) > ./flat/base.pkg/Scripts
cd ./pkgroot && find . | cpio -o --format odc --owner 0:80 | gzip -c ) > ./flat/base.pkg/Payload
The next couple of files require some information, run these commands to get the files count and files size of your pkgroot folder:
# Files count
find ./pkgroot/ | wc -l
# Files size
du ./build/pkgroot/ | awk '{print $1}'
Change the placeholders in these files with the output you got (in our example, the package version is 1.0.0, you can change it as you like) and save them:
Distribution in the flat folder and PackageInfo in the base.pkg folder
<?xml version="1.0" encoding="utf-8"?>
<installer-gui-script minSpecVersion="2">
    <pkg-ref id="com.coolprogram.binfile">
        <bundle-version/>
    </pkg-ref>
    <options customize="never" require-scripts="false" hostArchitectures="x86_64,arm64"/>
    <volume-check>
        <allowed-os-versions>
            <os-version min="10.15"/>
        </allowed-os-versions>
    </volume-check>
    <choices-outline>
        <line choice="default">
            <line choice="com.coolprogram.binfile"/>
        </line>
    </choices-outline>
    <choice id="default"/>
    <choice id="com.coolprogram.binfile" visible="false">
        <pkg-ref id="com.coolprogram.binfile"/>
    </choice>
    <pkg-ref id="com.coolprogram.binfile" version="1.0.0" onConclusion="none" installKBytes="SIZE_PLACEHOLDER" auth="Root">#base.pkg</pkg-ref>
    <product id="com.coolprogram.binfile.1.0.0"/>
</installer-gui-script>
<?xml version="1.0" encoding="utf-8"?>
<pkg-info overwrite-permissions="true" relocatable="false" identifier="com.coolprogram.binfile" postinstall-action="none" version="1.0.0" format-version="2" auth="root">
    <payload installKBytes="SIZE_PLACEHOLDER" numberOfFiles="COUNT_PLACEHOLDER"/>
    <bundle-version/>
    <upgrade-bundle/>
    <update-bundle/>
    <atomic-update-bundle/>
    <strict-identifier/>
    <relocate/>
    <scripts>
        <preinstall file="./preinstall"/>
        <postinstall file="./postinstall"/>
    </scripts>
</pkg-info>
Next, we will pack the flat folder
cd ./flat && xar --compression none -cf './coolprogram.pkg' *
Signing packages requires using both the Developer ID Installer and the Apple Worldwide Developer Relations Certification Authority certificates.
Note: in our example, we have our certificate password protected
In our case, the first one is called installer_cert.p12 and the latter certroot.cer
again, we will create the pem and the der files for the signing process
openssl pkcs12 -in installer_cert.p12 -password pass:<PASSWORD> -certfile certroot.cer -nodes | openssl rsa -out key.pem
openssl pkcs12 -in installer_cert.p12 -password pass:<PASSWORD> -certfile certroot.cer -nodes  | openssl x509 -outform der -out cert.der
Now that we got the certificates, we can sign the coolprogram.pkg file
xar --sign -f ./coolprogram.pkg --sig-size 256 --cert-loc cert.der --digestinfo-to-sign digestinfo.dat
openssl pkeyutl -sign -inkey key.pem -in digestinfo.dat -out signature.dat
xar --inject-sig signature.dat -f ./coolprogram.pkg
Notarizing the package
The last step we have to do is to notarize the package with the Apple store API.
We will first create a json file with the 3 items we fetched earlier – the issuer ID, the API key and the private key, in our example the private key is called notarize.p8
rcodesign encode-app-store-connect-api-key -o key.json <ISSUER_ID> <API_KEY> notarize.p8
Finally, we will use the json file we created to call the apple store api and notarize our pkg file
rcodesign notary-submit --api-key-path key.json --wait ./coolprogram.pkg
The output should look something like:
creating Notary API submission for coolprogram.pkg (sha256: .............)
created submission ID: .....-1d8f-....-9c90-........
resolving AWS S3 configuration from Apple-provided credentials
uploading asset to s3://notary-submissions-prod/prod/.....-1d8f-.....-9c90-......
(you may see additional log output from S3 client)
S3 upload completed successfully
waiting up to 600s for package upload ......-1d8f-......-9c90-........ to finish processing
poll state after 0s: InProgress
poll state after 3s: InProgress
poll state after 7s: InProgress
poll state after 10s: InProgress
poll state after 13s: InProgress
poll state after 17s: Accepted
Notary API Server has finished processing the uploaded asset
fetching notarization log for .....-1d8f-.-.....9c90-.......
notary log> {
notary log>   "archiveFilename": "coolprogram.pkg",
notary log>   "issues": null,
notary log>   "jobId": ".....-1d8f-.....-9c90-.....",
notary log>   "logFormatVersion": 1,
notary log>   "sha256": "..........",
notary log>   "status": "Accepted",
notary log>   "statusCode": 0,
notary log>   "statusSummary": "Ready for distribution",
notary log>   "ticketContents": [
notary log>     {
notary log>       "cdhash": "........",
notary log>       "digestAlgorithm": "SHA-1",
notary log>       "path": "coolprogram.pkg"
notary log>     },
notary log>     {
notary log>       "arch": "arm64",
notary log>       "cdhash": ".....",
notary log>       "digestAlgorithm": "SHA-256",
notary log>       "path": "coolprogram.pkg/base.pkg Contents/Payload/opt/coolprogram/binfile"
notary log>     }
notary log>   ],
notary log>   "uploadDate": "2022-12-05T08:07:50.134Z"
notary log> }
And that’s it!
You can now distribute the coolprogram.pkg file to anyone without any issues!

Reference links:
https://gist.github.com/jcward/d08b33fc3e6c5f90c18437956e5ccc35
http://hogliux.github.io/bomutils/tutorial.html


FAQ
Can you build and distribute macOS software from a Linux machine?
Yes. Although Apple provides its packaging tools primarily for macOS, it is possible to create, sign, package, and notarize macOS software from Linux using compatible open source utilities, Apple developer certificates, and the App Store Connect API. This allows organizations to integrate macOS software packaging into Linux-based CI/CD pipelines without maintaining dedicated macOS build systems.
Why is Apple notarization important for enterprise software distribution?
Notarization verifies that an application has been scanned by Apple for known security issues before distribution. Modern versions of macOS use notarization to help protect users from malicious software, and many organizations require it to avoid installation warnings and support a trusted deployment process.
What Apple credentials are required to sign and notarize a macOS package?
The process typically requires Developer ID certificates for signing, the Apple Worldwide Developer Relations Certification Authority certificate, and App Store Connect API credentials, including an API key, Key ID, and Issuer ID. These components enable automated package signing and notarization.
Why would organizations automate macOS package creation in a Linux CI/CD pipeline?
Many development teams standardize on Linux-based build infrastructure for automation, scalability, and cost efficiency. Automating macOS package generation within the same pipeline reduces manual work, eliminates separate build processes, and creates a more consistent release workflow across operating systems.
Is a macOS system required for every stage of software packaging?
No. While enrollment in the Apple Developer Program and retrieval of developer certificates depend on Apple services, the package creation, signing, and notarization workflow can be performed from Linux once the required certificates and credentials have been prepared.
What is the difference between code signing and notarization?
Code signing proves the identity of the software publisher and confirms that the application has not been modified after signing. Notarization is a separate Apple validation process that scans the signed software before distribution. Enterprise macOS software commonly uses both controls.
How does automation improve the reliability of macOS software distribution?
Automated packaging reduces repetitive manual tasks and ensures that signing, package generation, and notarization follow the same validated process for every release. This improves consistency, reduces human error, and supports repeatable software delivery within DevOps workflows.
Can this approach support enterprise-scale software deployment?
Yes. Automating package creation and notarization makes it easier to integrate macOS application delivery into enterprise DevOps pipelines. Organizations managing multiple applications or frequent releases can standardize deployment while maintaining Apple's requirements for signed and notarized software.
About Author